

Husqvarna Rider 15V2 Ride On Mower Shop Manual 2003 – 2005
FILE DETAILS:
LANGUAGE:ENGLISH
PAGES:79
DOWNLOADABLE:YES
FILE TYPE:PDF
VIDEO PREVIEW OF THE MANUAL:

IMAGES PREVIEW OF THE MANUAL:


DESCRIPTION:
Husqvarna Rider 15V2 Ride On Mower Shop Manual 2003 – 2005
General instructions
The workshop handbook is written for personnel who are assumed to have general ride-on mower reparation and service know-how. The workshop where the ride-on mower is repaired should be equipped with safety devices in accordance with local regulations. No-one should attempt to repair the ride-on mower without having first read and understood the contents of this handbook. The machine is tested and approved only with the equipment originally provided or recommended by the manufacturer. The below-mentioned boxes are included in this workshop handbook, as is appropriate.
Special instructions
The fuel used in the ride-on mower has the following hazardous characteristics:
• Toxic fluid and fumes
• Can cause eye and skin complaints
• Can cause breathing difficulties
• Highly flammable
When using compressed air, do not direct the compressed air stream towards your, or anybody else’s, body. Air can be forced into the blood stream, thereby constituting a danger to life. Use eye protection when working with tensioned springs.
Use hearing protectors when test driving. After test driving, do not touch the silencer before it has cooled down. Risk of burn injuries. This especially applies if the ride-on mower is equipped with a catalytic converter. If consumed, the lining on and in the catalytic converter element is dangerous to health. Use protective gloves when working with the catalytic converter/silencer.
TABLE OF CONTENTS:
Husqvarna Rider 15V2 Ride On Mower Shop Manual 2003 – 2005
Safety regulations 2
General instructions 2
Special instructions 2
Special tools 3
Technical data 4
Dimensions 4
Engine 4
Gear box 4
Electrical system 4
Tightening moments 4
Mowing deck 5
Control points 5
Play 5
Delivery and dealer service 6
Maintenance schedule 8
Delivery measures 10
To our dealer 10
Packaging and unpacking 10
Parts enclosed in packaging 10
Battery 11
Steering wheel 12
Tow plate 12
Oil levels 12
Wheels 13
Test running 14
Speed regulator 15
Administration 15
Design and function 16
General 16
Serial number 16
Engine 17
Steering 18
Driving 19
Mowing deck 20
Reparation instructions 23
Removing engine 23
Replacing engine 25
Fuel tank 28
Changing engine oil 29
Checking and adjusting steering wires 29
Replacing steering wires 30
Removal/installation of steering axle 30
Removing/Fitting the Power Steering 31
Removal/installation of wire wheel 32
Checking and adjusting brake wire 33
Checking and adjusting throttle control 34
Checking and adjusting throttle wire 35
Checking and adjusting choke wire 35
Replacing articulated steering bearing 36
Removal of swing axle 38
Replacing bushings 39
Installation of swing axle 39
Removal/installation of hydrostatic
transmission 40
Replacing hydrostatic transmission axle
sealing collars 4
Input axle 42
Outgoing axles 43
Replacing hydrostatic transmission wire 44
Removal of hyrostatic transmission wire 44
Refitting hydrostatic transmission wire 45
Bleeding the Hydrostatic and Hydraulic
Systems 48
Adjustment of transmission neutral position 48
Transmission maintenance 50
Oil change 50
Removal of belt 51
Checking and adjusting mower deck ground
pressure 51
Checking and adjusting mower deck
parallelism 52
Adjusting cutting height area 52
Adjusting cutting height 53
Replacing breakpin 53
Removal of mowing deck 54
Return from Service Position 55
Removal of BioClip Plug 56
Replacing mowing deck belts 56
Belt replacement on BioClip 90 56
Belt replacement on Combi 103 57
Belt replacement on cutting unit with side
or rear ejection and Combi 112, 122 58
Removal of blades with bearings 59
Grinding and balancing of blades 62
Pulse air valve intake filter 62
Cleaning the pulse air filter 62
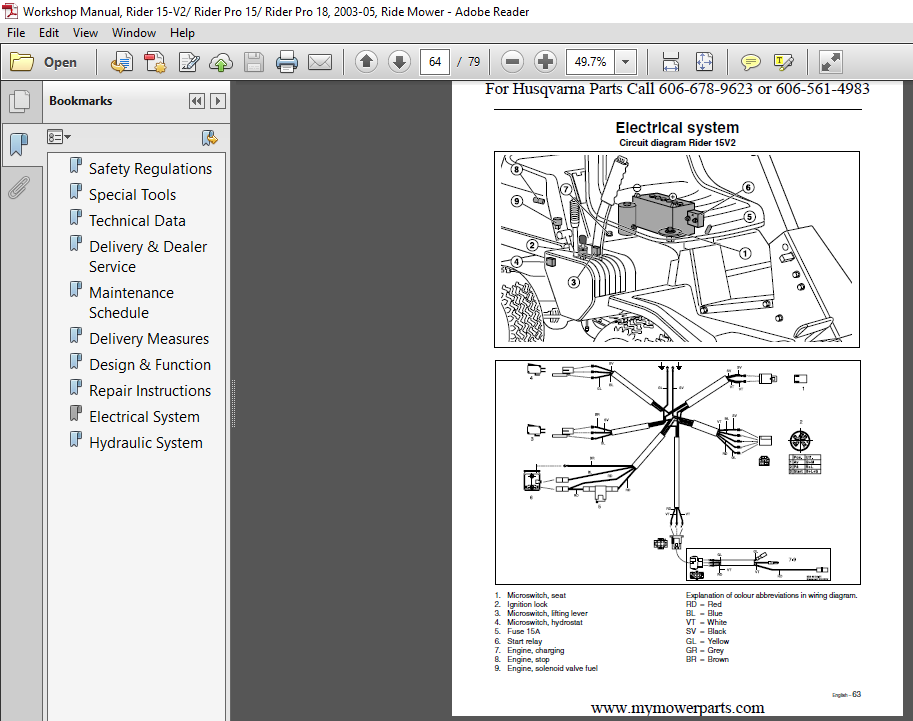
Electrical system 63
Circuit diagram 15V2 63
Circuit diagram Pro 15 64
Circuit diagram Pro 18 65
Replacing the light bulbs 66
Checking of safety system 67
Microswitch Cutting Unit 68
Microswitch: Neutral Position 68
Microswitch: Seat 68
Hour meter 69
Main Fuse 69
Ignition and Starter Lock 69
Hydraulic System 70
General 70
Hydraulic Hygiene 70
Hydraulic Oils 70
Fixing Oil Leaks 70
Keeping Hydraulic Oil Clean 71
Working Methods 71
System 71
Bleeding the Hydraulic System 71
Power Steering 71
Hydraulic oil filter, replacement 71
Pressure Limiting Valve 72
PLEASE NOTE:
- This is the same manual used by the DEALERSHIPS to SERVICE your vehicle.
- The manual can be all yours – Once payment is complete, you will be taken to the download page from where you can download the manual. All in 2-5 minutes time!!
- Need any other service / repair / parts manual, please feel free to contact us at heydownloadss @gmail.com . We may surprise you with a nice offer


