

Audi Q8 2018 – 2020 Complete Service Repair Workshop Manual
IMAGES PREVIEW:


VIDEO PREVIEW OF THE MANUAL:

DESCRIPTION:
- 00-General Information
- 01-Running Gear.pdf
- 02—Brake System.pdf
- 03-Communication.pdf
- 04-Driver Assist System.pdf
- 05-Electrical System.pdf
- 06-Body Repairs.pdf
DETAILED TABLE OF CONTENTS:
Contents
1 General information 1
11 — Change history — 1
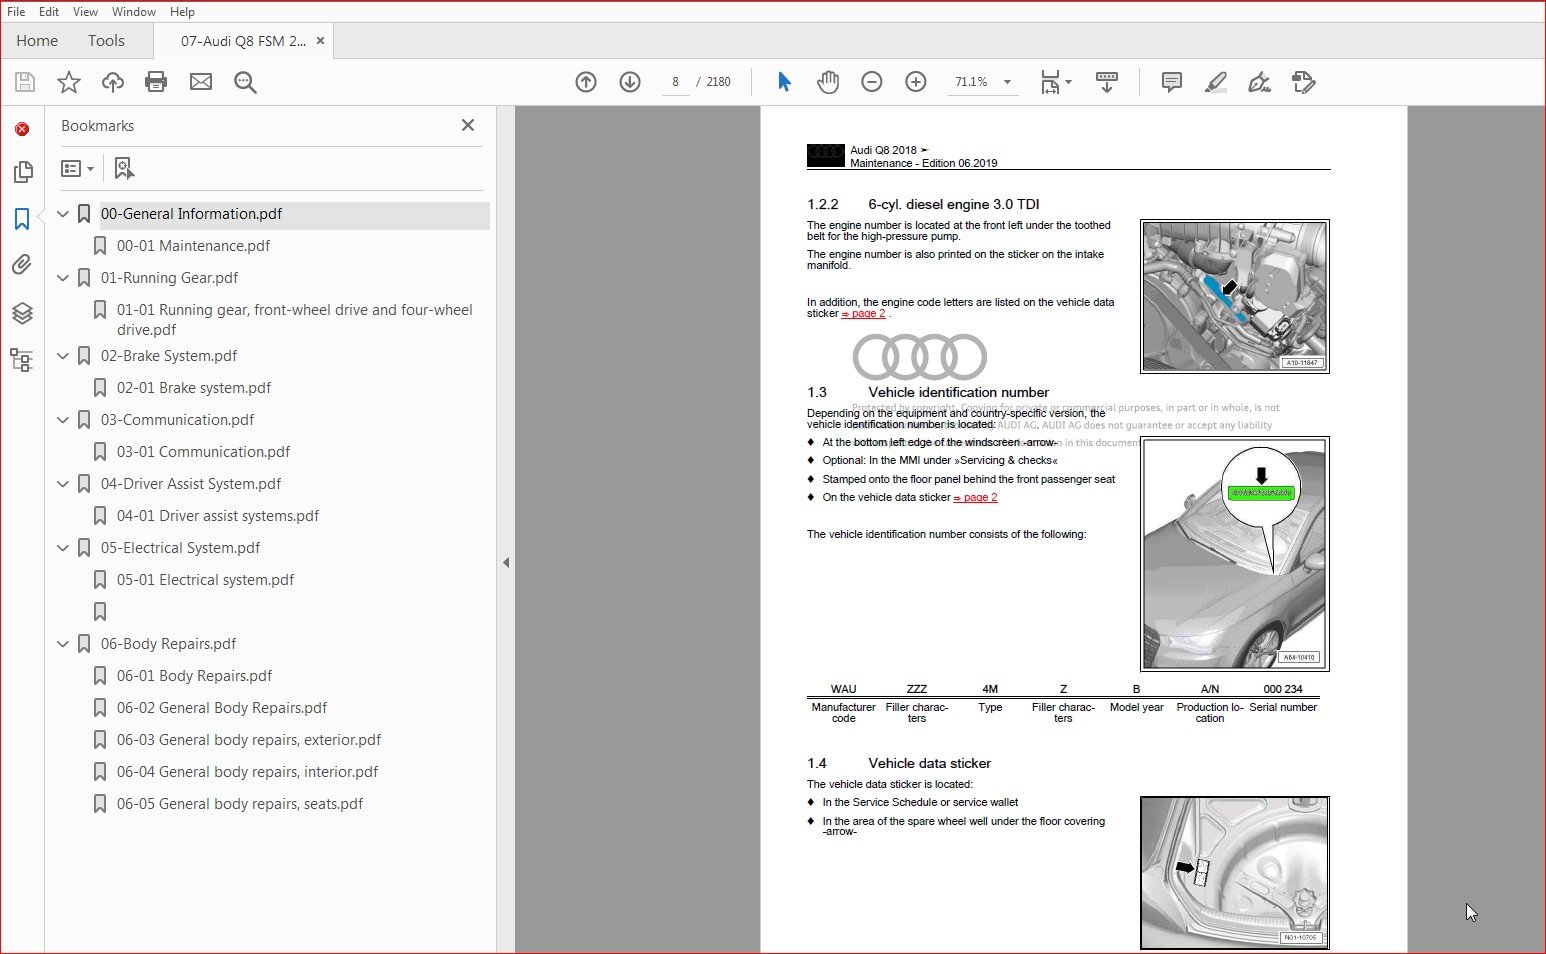
12 Engine number 1
13 Vehicle identification number 2
14 Vehicle data sticker 2
15 Warnings for high-voltage vehicles 3
2 Preparations 9
21 Vehicle: raising 9
22 Engine cover panel: removing and installing 11
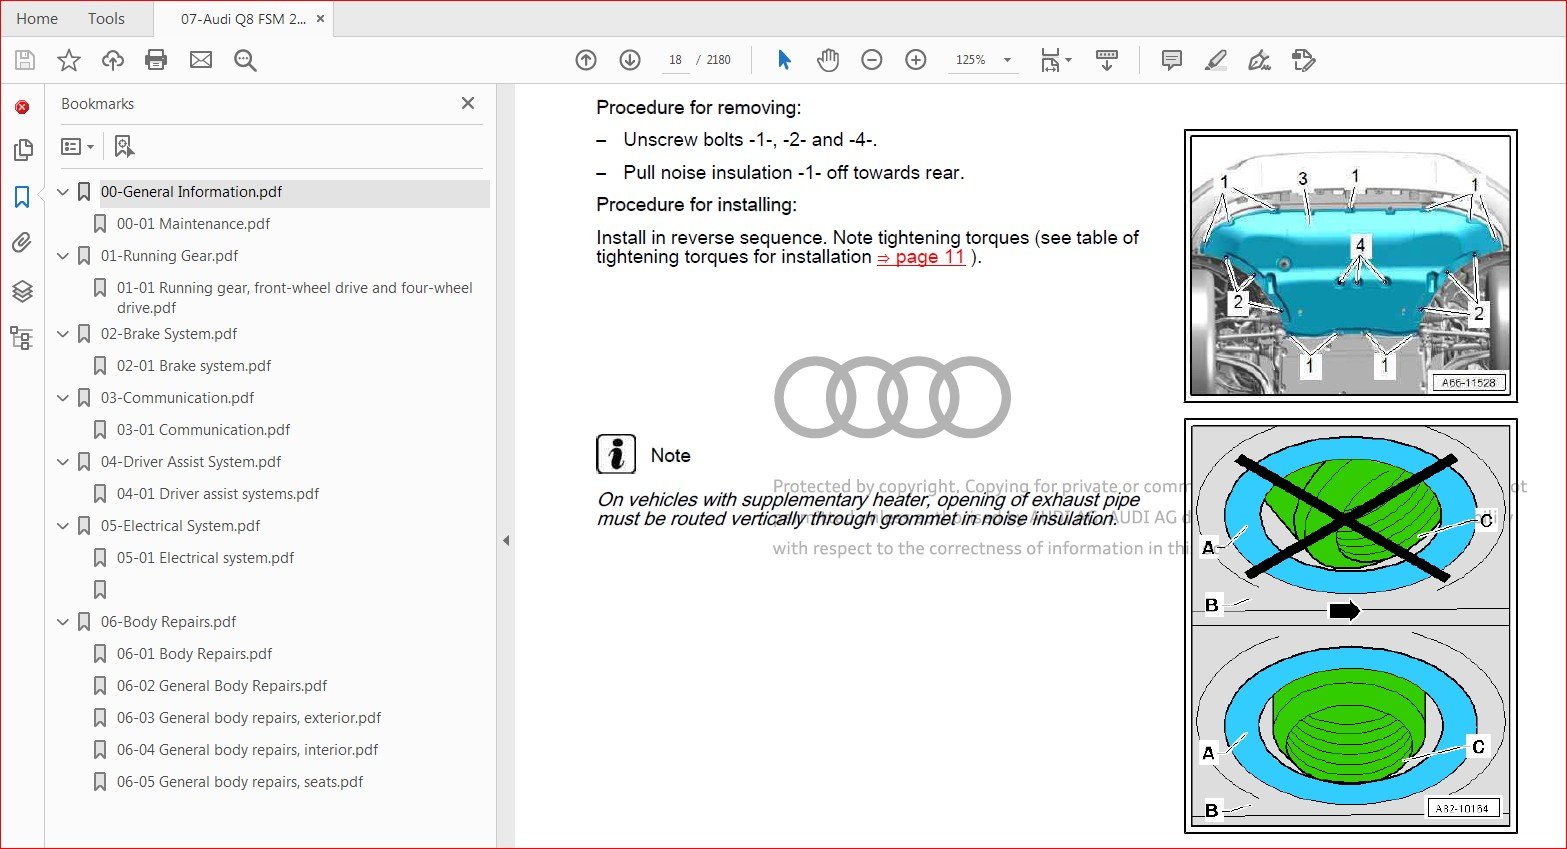
23 Noise insulation: removing and installing 11
24 Window regulators: activating automatic open/close function 13
25 Vehicle diagnostic tester: connecting 13
3 Maintenance 16
31 Diesel particulate filter: reading out ash deposit volume 19
32 Event memory: reading out 20
33 ERA-GLONASS: checking emergency call function 21
34 Emergency call function: checking status LED 21
35 Service interval display: resetting service event 22
36 Diagnostic work: performing 23
37 Flight mode: deactivating 23
38 Transport mode: deactivating 24
39 Shipping mode: deactivating 24
310 Battery: reading out status 25
311 Connecting vehicle diagnostic tester and sending diagnostic log 26
312 Transport mode: checking activation and activating if necessary 26
313 Swerve assist and turn-off assist: activating in MMI 27
314 Battery: checking electrolyte level 27
315 Battery: connecting stationary battery charging unit (min 30A, charging voltage max 148 V
on IV characteristic curve) 29
316 Battery: determining and recording state of charge (SOC) 31
317 Mirror hanger indicating defective battery: renewing battery on affected vehicles 33
318 Data sheet for Radio Equipment Directive: printing and placing in glove compartment 33
319 Connected gateway: renewing emergency battery 34
320 Connectivity box: checking emergency battery 35
321 Brake fluid: changing 35
322 Brake fluid (vehicles older than 12 months): changing 39
323 Brake fluid: checking fluid level 39
324 Brake system: checking condition of brake hoses, and checking that caps are fitted on bleeder
screws 40
325 Brake pads: checking thickness 41
326 Brake discs: checking for surface rust and operating brakes to clean if necessary 42
327 Parking brake: releasing 43
328 Tyres: checking condition and wear pattern, and checking and recording tread depth 43
329 Tyres: checking tyre pressures and adjusting if necessary 44
330 Tyres (except spare wheel): checking tyre pressures and adjusting to 35 bar if necessary
46
331 Tyre Pressure Loss Indicator: storing changed tyre pressures 46
332 Tyre repair kit: checking that set is complete, and checking and recording expiry date 46
333 Wheel bolts: tightening to specified torque 47
334 Axles (front and rear): checking components for play, secure attachment and damage, and
checking protective boots 47
335 Suspension struts on front and rear axle: removing locking elements and correctly fitting
bump stops 52
336 Engine, gearbox, final drive and steering: checking for leaks and damage 54
Audi Q8 2018 ➤
Maintenance – Edition 062019
Contents i
337 Vehicle (from below): checking for damage 54
338 Underbody: checking trim, wheel housing liners, side members and pipes/wiring for damage,
and checking that they are properly secured 54
339 Roof insert for panorama sunroof: checking operation 55
340 Water drains – sliding panoramic sunroof: checking 55
341 Door hinges with separate door arrester: cleaning and lubricating 56
342 Windscreen/rear window washer system: checking spray pattern and adjusting if
necessary 57
343 Wiper blades: checking for damage 60
344 Headlight washer system: checking operation 61
345 Headlights: checking for correct adjustment 61
346 Headlights and reversing lights, side lights, number plate lights, turn signals, hazard warning
lights: checking operation 63
347 Luggage compartment lighting: checking operation 64
348 Luggage compartment: removing protective film and felt pieces 64
349 Glove box light, interior lighting and reading light: checking operation 64
350 Horn: checking operation 64
351 Passenger airbag: checking key switch on/off and setting to “on” 65
352 Owner’s literature: checking that all documents are present 65
353 Service wallet: affixing vehicle data sticker 65
354 Service Schedule: entering Delivery Inspection 66
355 Seat belts: checking fixing device for latch plate, and checking locking action of automatic
belt retractor 66
356 Vehicle interior: removing protective covers for seats and carpet 66
357 Vehicle interior: checking that it is clean and cleaning if necessary 67
358 Vehicle interior: removing any objects other than those protecting interior surfaces 67
359 Vehicle interior and exterior: checking for and documenting any damage 67
360 Instrument cluster: checking warning lamps 67
361 Warning triangle: checking availability 67
362 First-aid kit: checking and recording expiry date 68
363 Vehicle keys: checking operation and recording number of keys given to customer 68
364 Vehicle key: removing from ignition lock 68
365 Vehicle key(s), wheel covers and owner’s literature: checking availability and recording
number present 68
366 Sun visors: checking that they are folded up and folding up if necessary 69
367 Luggage compartment cover and sun blind: checking that they are rolled up and rolling up if
necessary 69
368 Engine oil: draining 69
369 Engine oil: extracting 70
370 Engine oil: renewing oil filter 70
371 Engine oil: filling up 72
372 Engine oil: checking oil level and correcting if necessary 73
373 Spark plugs: renewing 74
374 Coolant level: checking (coolant level must reach at least top marking on coolant expansion
tank) 79
375 Cooling system for high-voltage system: checking anti-freeze protection and coolant level,
and correcting if necessary 81
376 Air quality package: renewing fragrance vials 85
377 Air cleaner: renewing filter element and cleaning housing 86
378 Rear final drive: changing gear oil 90
379 Rear final drive: changing ATF 90
380 Dust and pollen filter: renewing 90
381 Fuel filter: renewing 91
382 Plenum chamber and water drains: checking for dirt 94
383 Fuel filter: draining 96
384 Fuel tank: adding fuel additive 96
385 Reducing agent (AdBlue®): filling up tank completely 97
386 Vehicle doors: removing edge protection 101
Audi Q8 2018 ➤
Maintenance – Edition 062019
ii Contents
387 Vehicle exterior: checking unprotected areas for dirt, and cleaning if necessary 101
388 Protective display films: removing if present 101
389 Vehicle exterior: removing protective film, if present 102
390 Vehicle: cleaning interior and exterior 102
391 Vehicle cover: checking position and correcting if necessary 102
392 Vehicle cover: removing according to manufacturer’s instructions 102
393 Paintwork, trims, side windows and wiper blades: checking cleanliness 102
394 Body: checking vehicle paintwork for damage and corrosion from below and with bonnet, rear
lid and doors open 102
395 Vehicles parked outdoors: locking 102
396 Road test 102
397 Stock vehicles: observing measures specified in Maintenance table for stock vehicles (see
“Before handing vehicle over to customer”) 103
398 Accessories: installing 103
399 “TQS – Documentation of the vehicle care” checklist: checking that list is present 104
3100 “Stock vehicle maintenance” checklist: signing and placing in vehicle wallet 104
3101 Cleaning and care: checking that required measures have been carried out on time 104
3102 Stock vehicle care management: deciding and recording date of next check 104
3103 Display instruments: setting time and date 104
3104 Manual gearbox/automatic gearbox: selecting 1st gear/park 105
3105 Interior mirror: calibrating compass 105
3106 Poly V-belt for ancillaries: renewing 105
3107 Instrument cluster: resetting driver information system 105
4 Exhaust emissions test 106
41 Petrol engines: performing exhaust emissions test 106
42 Diesel engines: performing exhaust emissions test 113
Audi Q8 2018 ➤
Maintenance – Edition 062019
Contents
00 – Technical data 1
1 General notes 1
11 Running gear 1
12 Steering 2
13 Types of tyre 2
14 General notes on drive shaft 2
2 Safety precautions 4
21 Safety precautions when working on vehicles with start/stop system 4
22 Safety precautions when working on subframe 4
23 Safety precautions when using testers and measuring instruments during a road test 4
3 Repair notes 5
31 Leaks at shock absorbers 5
32 Checking shock absorbers when removed 6
33 Checking shock absorbers on shock tester 6
34 Maximum values “a” in mm 7
35 Rules for cleanliness 8
36 General notes 8
37 General repair instructions 9
38 Contact corrosion 9
39 Steering rack 10
310 Gaskets and seals 10
311 Bolts and nuts 10
312 Electrical components 10
313 Routing and attaching lines and wiring 10
314 Repairing damaged threads in longitudinal member (subframe to body) 11
315 Lifting suspension to unladen position – vehicles with coil springs 11
316 Lifting suspension to normal level – vehicles with air suspension 13
4 Disposal 17
41 Releasing gas and draining front gas-filled shock absorbers 17
42 Releasing gas and draining rear gas-filled shock absorbers 17
43 Discharging front suspension strut (air suspension) 18
44 Discharging accumulator 19
40 – Front suspension 21
1 Front axle 21
11 Overview – front axle 21
2 Subframe 22
21 Exploded view – subframe 22
22 Fixing position of subframe 25
23 Lowering subframe 27
24 Removing and installing subframe with steering rack 31
25 Removing and installing subframe cross brace 39
26 Removing and installing subframe shield 40
3 Anti-roll bar 43
31 Exploded view – anti-roll bar 43
32 Removing and installing anti-roll bar 47
33 Removing and installing coupling rod 51
34 Removing and installing roll stabiliser control unit J924 54
4 Suspension strut, upper links 59
41 Exploded view – suspension strut, upper links 59
42 Removing and installing suspension strut 67
43 Servicing suspension strut 70
Audi Q7 2016 ➤ , Audi Q8 2018 ➤
Running gear, front-wheel drive and four-wheel drive – Edition 122018
Contents i
44 Removing and installing upper suspension link 73
45 Renewing bush for upper link 75
46 Renewing boot 77
47 Charging suspension strut 78
48 Removing and installing shock absorber fork 80
49 Removing and installing body brace 83
5 Lower suspension links, swivel joint 92
51 Exploded view – lower suspension links, swivel joint 92
52 Removing and installing track control link 93
53 Removing and installing guide link 96
54 Renewing bush for track control link 98
55 Removing and installing swivel joint 103
56 Removing and installing bonded rubber bush for guide link 104
6 Wheel bearing 107
61 Exploded view – wheel bearing 107
62 Removing and installing wheel bearing housing 107
63 Removing and installing wheel bearing unit 110
64 Servicing wheel bearing unit 112
7 Drive shaft 116
71 Exploded view – drive shaft 116
72 Removing and installing drive shaft 118
73 Removing and installing heat shield for drive shaft 119
74 Loosening and tightening nut/bolt securing drive shaft 120
75 Dismantling and assembling drive shaft 121
76 Servicing constant velocity joint 132
77 Checking outer constant velocity joint 133
78 Tightening hose clip on triple roller joint and outer joint 134
42 – Rear suspension 137
1 Rear axle 137
11 Overview – rear axle 137
2 Subframe 138
21 Exploded view – subframe 138
22 Fixing position of subframe 140
23 Removing and installing subframe 143
24 Servicing subframe 146
3 Anti-roll bar 156
31 Exploded view – anti-roll bar 156
32 Removing and installing anti-roll bar 158
33 Removing and installing coupling rod 162
34 Removing and installing roll stabiliser control unit 2 J1096 163
4 Suspension links, track rod 165
41 Exploded view – transverse links 165
42 Removing and installing upper transverse link 167
43 Removing and installing lower transverse link 171
44 Removing and installing track rod 176
45 Removing and installing wind deflector 178
5 Suspension strut/shock absorber, spring 180
51 Exploded view – suspension strut/shock absorber, spring 180
52 Removing and installing shock absorber 184
53 Servicing shock absorber 187
54 Removing and installing spring 187
6 Wheel bearing, trailing arm 197
61 Exploded view – wheel bearing 197
Audi Q7 2016 ➤ , Audi Q8 2018 ➤
Running gear, front-wheel drive and four-wheel drive – Edition 122018
ii Contents
62 Removing and installing wheel bearing housing 198
63 Removing and installing wheel bearing unit 201
64 Servicing wheel bearing unit 202
7 Drive shaft 206
71 Exploded view – drive shaft 206
72 Removing and installing drive shaft 208
73 Loosening and tightening nut/bolt securing drive shaft 209
74 Dismantling and assembling drive shaft 209
75 Checking outer constant velocity joint 217
76 Checking inner constant velocity joint 217
43 – Self-levelling suspension 220
1 Vehicle level senders 220
11 Exploded view – front vehicle level sender 220
12 Exploded view – rear vehicle level sender 221
13 Removing and installing front vehicle level senders G78 / G289 221
14 Removing and installing rear vehicle level senders G76 / G77 222
2 Air suspension 223
21 Overview of fitting locations – electrical components 223
22 Overview of fitting locations – air suspension 225
23 Exploded view – air pipes 226
24 Exploded view – air supply unit 228
25 Setting normal level and permanently disabling control 230
26 Re-adapting normal level 231
27 Bleeding and charging air spring system 233
28 Removing and installing running gear control unit J775 234
29 Removing and installing adaptive suspension compressor electronics J1135 236
210 Checking air suspension for leaks 237
211 Servicing air pipe 239
212 Renewing connection piece 242
213 Removing and installing air supply unit 244
214 Removing and installing filter 246
215 Removing and installing solenoid valve block 247
216 Removing and installing accumulator 248
44 – Wheels, tyres, vehicle geometry 250
1 Wheels, tyres 250
2 Tyre Pressure Monitoring System 251
21 Removing and installing Tyre Pressure Monitoring System control unit J502 251
3 Wheel alignment 252
31 Notes on wheel alignment 252
32 Test requirements 252
33 Preparations for measurement 254
34 When does wheel alignment have to be checked? 256
35 Wheel alignment procedure 257
36 Explanatory notes on production control numbers (PR numbers) 260
37 Wheel runout compensation 260
38 Checking full steering lock 260
39 Checking unladen position for wheel alignment – vehicles with coil springs 261
310 Checking normal level for wheel alignment – vehicles with air suspension 262
311 Wheel alignment specifications 264
312 Adjusting camber at rear wheels 267
313 Adjusting toe setting at rear wheels 268
314 Centralising camber at front wheels 269
315 Adjusting toe setting at front wheels 270
Audi Q7 2016 ➤ , Audi Q8 2018 ➤
Running gear, front-wheel drive and four-wheel drive – Edition 122018
Contents iii
316 Basic setting for steering angle sender G85 271
4 Adaptive cruise control 273
41 Adjusting adaptive cruise control 273
5 Front camera for driver assist systems 280
51 Calibrating front camera for driver assist systems 280
6 Night vision system 286
61 Calibrating night vision system 286
48 – Steering 293
1 Steering wheel 293
11 Exploded view – steering wheel 293
12 Removing and installing steering wheel 295
2 Steering column 297
21 Exploded view – steering column 297
22 Checking steering column for damage 300
23 Handling and transporting steering column 300
24 Removing and installing steering column 301
25 Removing and installing intermediate steering shaft 302
26 Removing and installing control unit for electrically adjustable steering column J866 305
27 Removing and installing control unit for electronic steering column lock J764 305
3 Steering rack 307
31 Exploded view – steering rack 307
32 Handling and transporting steering rack 310
33 Removing and installing steering rack 311
34 Removing and installing boot 315
35 Removing and installing track rod 317
36 Removing and installing track rod ball joint 319
37 Re-adapting end stops of steering rack 321
4 Rear wheel steering rack 323
41 Exploded view – rear wheel steering rack 323
42 Removing and installing rear wheel steering rack 325
43 Aligning rear wheel steering rack 332
44 Checking alignment of rear wheel steering rack 335
45 Bringing rear wheel steering rack into zero position – Audi Q8 337
Audi Q7 2016 ➤ , Audi Q8 2018 ➤
Running gear, front-wheel drive and four-wheel drive – Edition 122018
Contents
00 – Technical data 1
1 Identification 1
11 PR number and type of brake system 1
2 Safety precautions 2
21 Safety precautions when working on vehicles with start/stop system 2
22 Safety precautions when using testers and measuring instruments during a road test 2
3 Repair notes 3
31 Rules for cleanliness 3
32 General repair instructions 3
33 Contact corrosion 3
4 Technical data 4
41 Technical data for brakes 4
5 Brake test 7
51 General notes 7
52 Testing vehicles with four-wheel drive 7
53 Testing parking brake 8
54 Visible features of ceramic brake discs 9
55 Superficial cracks in cooling channel lands 10
56 Cracks in area of bolted connection on ceramic brake discs 11
57 Edge fractures 11
58 Chipping on ceramic brake discs 12
59 Cracks extending into cooling channels 12
510 Wear assessment of ceramic brake disc without tester VAS 6813 12
511 Wear assessment of ceramic brake disc with tester VAS 6813 17
45 – Anti-lock brake system 23
1 General notes 23
11 Notes for repair work on the ABS 23
2 Overview of fitting locations 24
21 Overview of fitting locations – ABS/ESP 24
3 Control unit and hydraulic unit 26
31 Exploded view – control unit and hydraulic unit 26
32 Removing and installing ABS control unit J104 / ABS hydraulic unit N55 29
33 Separating control unit from hydraulic unit 34
34 Attaching control unit to hydraulic unit 35
35 Connecting brake lines to hydraulic unit 37
4 Sensors 38
41 Exploded view – front wheel speed sensor 38
42 Exploded view – rear wheel speed sensor 39
43 Removing and installing front wheel speed sensor G45 / G47 39
44 Removing and installing rear wheel speed sensor G44 / G46 40
45 Checking ABS sensor ring 40
46 – Brakes – mechanism 42
1 Front brakes 42
11 Exploded view – front brakes 42
12 Removing and installing brake pads 45
13 Removing and installing brake caliper 49
14 Renewing brake caliper 52
15 Removing and installing brake disc 56
16 Removing and installing splash plate 57
17 Removing and installing pad wear indicator wire 58
Audi Q8 2018 ➤
Brake system – Edition 042019
Contents i
2 Rear brakes 61
21 Exploded view – rear brakes 61
22 Removing and installing brake pads 63
23 Removing and installing brake caliper 69
24 Renewing brake caliper 71
25 Removing and installing brake carrier 74
26 Removing and installing brake disc 75
27 Removing and installing splash plate 76
28 Removing and installing pad wear indicator wire 77
3 Parking brake 79
31 Exploded view – parking brake 79
32 Removing and installing parking brake motor V282 / V283 80
33 Releasing parking brake manually 81
4 Brake pedal 83
41 Exploded view – brake pedal 83
42 Removing and installing mounting bracket 84
43 Separating brake pedal from brake servo 85
44 Connecting brake pedal to brake servo 86
45 Removing and installing brake pedal 86
47 – Brakes – hydraulics 88
1 Front brake caliper 88
11 Exploded view – front brake caliper 88
12 Removing and installing brake pistons 88
2 Rear brake caliper 92
21 Exploded view – rear brake caliper 92
22 Removing and installing brake caliper piston 92
3 Brake servo / brake master cylinder 97
31 Exploded view – brake servo / brake master cylinder 97
32 Removing and installing brake light switch 99
33 Removing and installing brake servo 101
34 Removing and installing brake master cylinder 104
35 Removing and installing brake fluid reservoir 106
36 Removing and installing brake fluid level warning contact F34 109
4 Vacuum system 110
41 Exploded view – vacuum pump 110
42 Checking non-return valve 112
43 Removing and installing non-return valve 112
44 Removing and installing vacuum pump 114
45 Removing and installing brake servo pressure sensor 116
46 Checking vacuum system 116
5 Hydraulic system 121
51 General notes on brake fluid 121
52 Bleeding hydraulic system 122
53 Leak test 12991 – Communication 1
1 Infotainment system 1
11 Layout – infotainment system 1
12 Overview of fitting locations – infotainment system 5
13 Removing and installing infotainment system display 5
14 Removing and installing control unit 1 for information electronics J794 7
15 Removing and installing driver side volume regulator E67 9
2 Sound system 11
21 Layout – sound system 11
22 Overview of fitting locations – sound system 17
23 Removing and installing digital sound package control unit/amplifier 22
24 Removing and installing rear treble loudspeakers 25
25 Removing and installing front treble loudspeakers R20 / R22 26
26 Removing and installing rear mid-range loudspeakers 27
27 Removing and installing front mid-range loudspeakers 28
28 Removing and installing rear bass loudspeakers R15 / R17 29
29 Removing and installing front bass loudspeakers R21 / R23 30
210 Removing and installing subwoofer R211 31
211 Removing and installing effect loudspeakers 32
212 Removing and installing centre loudspeaker 33
213 Removing and installing internal microphone R74 34
3 Aerial systems 35
31 Layout – aerial systems 35
32 Overview of fitting locations – aerial systems 37
33 Removing and installing aerial amplifiers 39
34 Removing and installing window aerial suppression filter 42
35 Removing and installing traffic data aerial 43
36 Removing and installing dedicated short-range communication aerial 44
37 Removing and installing roof aerial 44
38 Removing and installing emergency call module aerial 45
39 Removing and installing LTE aerials 46
310 Removing and installing internal vehicle communication aerial R364 47
311 Removing and installing near field communication aerial 48
312 Removing and installing bumper aerials 48
313 Removing and installing GPS aerial 49
314 Removing and installing satellite tuner aerial R172 50
315 Removing and installing digital radio aerial 50
316 Removing and installing near field communication control unit 50
317 Removing and installing roof aerial control unit JX3 51
4 Radio 52
41 Layout – radio 52
42 Overview of fitting locations – radio 56
43 Removing and installing radio 56
44 Removing and installing digital radio 56
5 DVD/CD changer 57
51 Removing and installing DVD player R7 57
6 Telephone system 59
61 Layout – telephone 59
62 Overview of fitting locations – telephone system 68
63 Exploded view – microphone unit 68
64 Removing and installing front microphone R140 / R141 69
65 Removing and installing aerial amplifier for mobile telephone R86 70
Audi Q8 2018 ➤
Communication – Edition 102018
Contents i
66 Removing and installing telephone bracket 70
7 Navigation system 72
71 Layout – navigation system 72
72 Overview of fitting locations – navigation system 74
73 Removing and installing control unit for navigation system 74
74 Removing and installing chip card reader control unit 74
8 TV system 75
81 Layout – TV system 75
82 Overview of fitting locations – TV system 76
83 Removing and installing TV tuner 77
84 Removing and installing TV card reader 78
9 Reversing camera system 79
10 Multi-function steering wheel 80
101 Layout – multi-function steering wheel 80
102 Exploded view – multi-function steering wheel 80
103 Removing and installing multifunction buttons in steering wheel E441 / E440 81
104 Removing and installing tiptronic switches in steering wheel E480 / E479 82
11 Speech dialogue system 84
111 Layout – speech dialogue system 84
112 Removing and installing speech dialogue system 84
12 Connection for external multimedia devices 85
121 Layout – connection for external multimedia devices 85
122 Removing and installing connection for external multimedia devices 86
13 Night vision system 87
14 Overhead view camera 88
15 Mobile online services 89
151 Layout – mobile online services 89
152 Overview of fitting locations – mobile online services 91
153 Removing and installing emergency call module control unit and communication unit
J949 93
154 Removing and installing loudspeaker for emergency call module R335 93
Audi Q8 2018 ➤
Communication – Edition 102018
ii00 – Technical data 1
1 Safety precautions 1
11 Safety precautions when working on vehicles with start/stop system 1
12 Safety precautions when using testers and measuring instruments during a road test 1
2 Repair notes 2
21 Rules for cleanliness 2
22 General notes 2
23 Contact corrosion 2
24 Routing and attaching lines and wiring 2
98 – Assist systems 4
1 Fitting locations 4
11 Overview of fitting locations – senders, sensors and control units in front section of vehicle
4
12 Overview of fitting locations – senders, sensors and control units in centre section of
vehicle 6
13 Overview of fitting locations – senders, sensors and control units in rear section of vehicle
7
2 Senders/sensors/control units 10
21 Removing and installing rear parking aid senders G203 / G204 / G205 / G206 10
22 Removing and installing front parking aid senders G252 / G253 / G254 / G255 12
23 Removing and installing front park assist steering senders G568 / G569 13
24 Removing and installing rear park assist steering senders G716 / G717 13
25 Removing and installing rear parking aid warning buzzer H15 14
26 Removing and installing front parking aid warning buzzer H22 14
27 Exploded view – adaptive cruise control unit 14
28 Removing and installing adaptive cruise control unit J428 16
29 Removing and installing reversing camera system control unit J772 20
210 Removing and installing lane change assist control unit J769 / J770 20
211 Removing and installing control unit for night vision system J853 20
212 Removing and installing front radar sensor control unit for object detection J1088 / J1089
21
213 Exploded view – driver assist systems control unit 22
214 Removing and installing driver assist systems control unit J1121 23
215 Exploded view – control unit for laser distance control 25
216 Removing and installing control unit for laser distance control J1122 26
217 Removing and installing lane change assist warning lamp in exterior mirror K233 / K234
29
218 Removing and installing reversing camera R189 29
219 Exploded view – camera for night vision system 29
220 Removing and installing camera for night vision system R212 30
221 Exploded view – front camera for driver assist systems 32
222 Removing and installing front camera for driver assist systems R242 33
223 Removing and installing front overhead view camera R243 34
224 Removing and installing right/left overhead view camera R244 / R245 35
225 Removing and installing rear overhead view camera R246 36
3 Adaptive cruise control 37
31 Layout – adaptive cruise control 37
32 Adjusting adaptive cruise control 37
4 Parking aid/park assist steering/autonomous parking 48
41 Layout – parking aid/park assist steering/autonomous parking 48
5 Lane change assist 50
51 Layout – lane change assist 50
Audi Q8 2018 ➤
Driver assist systems – Edition 102018
Contents i
52 Calibrating lane change assist 50
6 Front corner radar 58
61 Layout – front corner radar 58
62 Calibrating front corner radar 58
7 Reversing camera system 64
71 Layout – reversing camera system 64
72 Calibrating reversing camera system 64
8 Night vision system 70
81 Layout – night vision system 70
82 Calibrating night vision system 70
9 Overhead view camera 77
91 Layout – overhead view camera 77
92 Calibrating overhead view camera 77
10 Front camera for driver assist systems 81
101 Layout – front camera for driver assist systems 81
102 Calibrating front camera for driver assist systems 81
00 – Technical data 1
1 Safety precautions 1
11 Safety precautions when working on vehicles with start/stop system 1
12 Safety precautions when using testers and measuring instruments during a road test 1
13 Notes on use and safety for LED headlights and Audi laser lights 1
2 Repair notes 2
21 Rules for cleanliness 2
22 General notes 2
23 Contact corrosion 2
24 ESD (electrostatic discharge) workplace 3
25 Routing and attachment of lines and wiring 3
26 Identification plates 3
27 Use of impact wrenches 3
3 Battery 5
31 Battery – general notes 5
32 Battery types 5
27 – Starter, current supply, CCS 6
1 Battery 6
11 Exploded view – battery 6
12 Disconnecting and connecting battery 9
13 Removing and installing earth cable with battery monitor control unit J367 11
14 Removing and installing battery 12
15 Removing and installing battery fan V457 20
16 Inspecting and classifying battery, 48 V A6 20
17 Checking battery 21
18 Charging battery 22
19 Removing and installing battery cut-off relay/battery isolation igniter 22
110 Removing and installing tray for battery, 48 V A6 , 48 Volt system 23
2 Voltage converter 24
21 Exploded view – voltage converter 24
22 Removing and installing voltage converter 25
3 Jump-start terminal 27
31 Exploded view – jump-start terminal 27
4 Alternator 28
41 Exploded view – alternator 28
42 Removing and installing alternator 30
43 Checking alternator 43
5 Starter 45
51 Exploded view – starter 45
52 Removing and installing starter 46
6 Adaptive cruise control 51
90 – Gauges, instruments 52
1 Dash panel insert 52
11 Exploded view – dash panel insert 52
12 Exploded view – head-up display 53
13 Removing and installing dash panel insert with control unit in dash panel insert J285 54
14 Removing and installing control unit for head-up display 56
2 Horn 58
21 Exploded view – horn 58
22 Removing and installing treble horn H2 / bass horn H7 59
Audi Q8 2018 ➤
Electrical system – Edition 052019
Contents i
92 – Windscreen wash/wipe system 60
1 Windscreen wiper system 60
11 Overview of fitting locations – windscreen wiper system 60
12 Exploded view – windscreen wiper system 61
13 Moving windscreen wipers to service position 63
14 Removing and installing wiper blade 63
15 Removing and installing wiper arms 64
16 Adjusting wiper arms 67
17 Removing and installing wiper motor V 68
18 Removing and installing rain and light sensor 69
2 Windscreen washer system 73
21 Exploded view – windscreen washer system 73
22 Removing and installing washer fluid reservoir 76
23 Removing and installing windscreen washer fluid level sender 78
24 Removing and installing washer pump 79
25 Removing and installing windscreen washer pump control unit J1100 79
26 Removing and installing washer jets 79
27 Adjusting washer jets 80
3 Rear window wiper system 81
31 Overview of fitting locations – rear window wiper system 81
32 Exploded view – rear window wiper system 82
33 Removing and installing wiper blade 82
34 Removing and installing wiper arm 82
35 Adjusting wiper arm 84
36 Removing and installing rear window wiper motor V12 84
4 Rear window washer system 86
41 Exploded view – rear window washer system 86
42 Removing and installing washer fluid reservoir 87
43 Removing and installing rear window washer pump 87
44 Removing and installing washer jet 88
45 Removing and installing washer jet for reversing camera R189 / rear overhead view camera
R246 89
46 Adjusting washer jet 89
5 Headlight washer system 90
51 Exploded view – headlight washer system 90
52 Removing and installing headlight washer system pump V11 91
53 Removing and installing washer jets 91
6 Washer fluid hoses 94
94 – Lights, bulbs, switches – exterior 95
1 Headlights 95
11 Exploded view – headlights 95
12 Removing and installing headlights 101
13 Adjusting headlights 105
14 Removing and installing LED module for daytime running light and side light L176 / L177
114
15 Removing and installing output module 1 for LED headlight A27 / A31 116
16 Removing and installing headlight fan 117
17 Removing and installing headlight range control motor V48 / V49 118
18 Adapting headlights for driving on the left side of the road 119
19 Adapting headlights for driving on the right side of the road 119
2 Lights in exterior mirror 120
21 Exploded view – lights in exterior mirror 120
22 Removing and installing turn signal 120
Audi Q8 2018 ➤
Electrical system – Edition 052019
ii Contents
3 Lights in exterior door handle 122
31 Exploded view – lights in exterior door handle 122
32 Removing and installing exterior door handle illumination bulb 122
4 Lights in sill panel trim 124
41 Overview – entry lights 124
5 Tail light cluster 125
51 Exploded view – tail light cluster on body 125
52 Exploded view – tail light cluster on rear lid 126
53 Removing and installing tail light cluster 127
54 Removing and installing rear fog light 127
55 Removing and installing tail light cluster on rear lid 128
56 Correcting installation position of tail light cluster 129
6 High-level brake light 131
61 Exploded view – high-level brake light 131
62 Removing and installing high-level brake light bulb 131
7 Number plate light 133
71 Removing and installing number plate light X4 / X5 133
8 Entry and start authorisation 134
81 Overview of fitting locations – entry and start authorisation system 134
82 Overview of fitting locations – keyless entry system 136
83 Exploded view – exterior door handle for keyless entry system 137
84 Removing and installing front exterior door handle switches 138
85 Removing and installing rear exterior door handle switches 138
86 Removing and installing interior aerial 1 for entry and start authorisation R138 139
87 Removing and installing front aerial for entry and start authorisation R376 139
88 Removing and installing luggage compartment aerial for entry and start system R137 140
89 Removing and installing aerial for entry and start authorisation R200 / R201 140
810 Removing and installing near field communication aerial 2 R351 140
811 Removing and installing near field communication control unit 2 J1170 141
9 Steering column switch module 142
91 Exploded view – steering column switch module 142
92 Removing and installing steering column switch module 142
10 Parking aid 144
11 Park assist steering 145
12 Automatic headlight range control 146
121 Overview – automatic headlight range control 146
96 – Lights, bulbs, switches – interior 147
1 Lights 148
11 Overview of fitting locations – lights in dash panel 148
12 Overview of fitting locations – lights in front doors 150
13 Overview of fitting locations – lights in rear doors 151
14 Overview of fitting locations – background lighting in doors 152
15 Overview of fitting locations – lights in centre console 154
16 Overview of fitting locations – lights in seats and B-pillars 155
17 Overview of fitting locations – lights in luggage compartment 156
18 Overview of fitting locations – lights in roof trim 157
19 Removing and installing glove compartment light W6 158
110 Removing and installing footwell illumination bulb (front) L151 / L152 158
111 Removing and installing central locking SAFELOCK function warning lamp K133 158
112 Removing and installing light for front interior door handle illumination 159
113 Removing and installing entry light W92 / W93 159
114 Removing and installing light for rear interior door handle illumination 159
115 Removing and installing rear entry light W83 / W84 160
Audi Q8 2018 ➤
Electrical system – Edition 052019
Contents iii
116 Removing and installing bulb for dashboard background lighting 160
117 Removing and installing front door background lighting bulb 164
118 Removing and installing rear door background lighting bulb 166
119 Removing and installing light for front centre console background lighting L193 / L195 167
120 Removing and installing selector lever position display Y5 168
121 Removing and installing rear footwell light W9 / W10 169
122 Removing and installing luggage compartment light 169
123 Removing and installing illuminated vanity mirror W20 / W14 170
2 Controls 172
21 Overview of fitting locations – controls in dash panel 173
22 Overview of fitting locations – controls in front doors 174
23 Overview of fitting locations – controls in rear doors 176
24 Overview of fitting locations – controls in centre console 177
25 Overview of fitting locations – controls in luggage compartment 179
26 Overview of fitting locations – controls in roof trim 180
27 Exploded view – front interior light 181
28 Removing and installing light switch E1 182
29 Removing and installing steering column adjustment switch E167 182
210 Removing and installing switches in dash panel 183
211 Removing and installing glove compartment light switch E26 184
212 Removing and installing exterior mirror adjuster EX11 184
213 Removing and installing operating unit for window regulator in driver door EX36 185
214 Removing and installing window regulator switch in front passenger door EX27 185
215 Removing and installing interior locking switch E150 / E198 185
216 Removing and installing operating unit for memory settings E464 / E465 186
217 Removing and installing rear lid remote release button E233 187
218 Removing and installing button for deactivating interior monitoring and vehicle inclination
sensor E616 187
219 Removing and installing operating unit in rear door EX60 / EX61 188
220 Removing and installing rear interior locking button for central locking system E717 / E718
188
221 Removing and installing electromechanical parking brake button E538 / auto-hold button
E540 188
222 Removing and installing entry and start authorisation button E408 189
223 Removing and installing operating unit for lowering load sill and for towing bracket EX52
189
224 Removing and installing rear lid handle release button E234 190
225 Removing and installing operating unit for rear lid control EX58 190
226 Removing and installing rear lid warning buzzer H32 191
227 Removing and installing sunroof button E325 191
228 Removing and installing interior light/reading light (front) 191
229 Dismantling and assembling interior light/reading light (front) 192
230 Removing and installing interior light/reading light (rear) 195
231 Removing and installing garage door operating unit E284 196
3 Anti-theft alarm system 197
31 Overview – interior monitoring 197
32 Removing and installing alarm horn H12 198
33 Removing and installing anti-theft alarm sensor G578 198
4 Lane change assist 199
5 Front camera for driver assist systems 200
6 Towing bracket 201
61 Overview – trailer socket, trailer detector control unit 201
62 Trailer socket 201
7 Cigarette lighter, socket 202
71 Exploded view – cigarette lighter, 12 V socket 202
72 Removing and installing cigarette lighter U1 / 12 V socket U5 203
Audi Q8 2018 ➤
Electrical system – Edition 052019
iv Contents
73 Removing and installing cigarette lighter illumination bulb L28 205
74 Removing and installing socket illumination bulb L42 206
75 Removing and installing rear cigarette lighter U9 / 12 V socket 2 U18 206
76 Removing and installing 12 V socket 3 U19 207
77 Renewing 12 V socket 3 U19 208
97 – Wiring 210
1 Relay carriers, fuse carriers, electronics boxes 210
11 Overview of fitting locations – relay carriers, fuse carriers, electronics boxes 210
12 Removing and installing relay and fuse carrier 2 SR2 216
13 Removing and installing suppression filter C24 220
14 Removing and installing wiring junction 221
15 Removing and installing fuse holder F SF 226
16 Removing and installing relay and fuse holders in luggage compartment (left-side) 227
2 Control units 230
21 Overview of fitting locations – control units 230
22 Exploded view – data bus diagnostic interface 231
23 Removing and installing onboard supply control unit J519 231
24 Removing and installing garage door operation control unit 232
25 Removing and installing data bus diagnostic interface J533 233
3 Connectors 235
31 Overview of fitting locations – connectors 235
32 Unplugging door disconnector 236
33 Removing and installing connector point on bulkhead (right-side) 236
34 Repairing electrical wiring harnesses and electrical connectors 236
4 Releasing and dismantling connector housings 237
5 Cleaning contact surfaces 238
6 Repairing aerial wires 239
7 Fibre optic cables 240
8 Vehicle diagnostic, testing and information systems 241
00 – Technical data 1
1 Vehicle identification data 1
11 Vehicle data sticker 1
12 Type plate 1
2 Important notes 2
3 Safety precautions 3
4 Work that requires high-voltage system to be de-energised 4
41 The high-voltage system must be de-energised to perform the following work 4
5 Repairing joints with flow-drill screws 5
6 Socket for flow-drill screws (alternative) 6
7 Repair methods 7
8 If replacement upper panel is supplied with pre-drilled holes 8
9 If replacement upper panel is not supplied with pre-drilled holes 9
10 Renewing upper and lower panels 10
11 Repair set for flow-drill screws -VAS 6631- 11
12 Extraction systems for steel/aluminium body repair station (“multi-material-mix” workplace)
12
13 Galvanised body panels, high-strength and extra-high strength steel 14
131 Ultra-high-strength hot-formed steel 15
132 Aluminium panels 17
14 Rivets accessible from one side only 21
15 Laser welding 22
16 Bonded joints with aluminium 23
17 Bonded joints 24
171 Bonded joints 24
172 Spot-welded/bonded joints 24
173 Inspecting and repairing bonded joints 24
174 Repair methods for replacing body parts 25
18 Overview of attachment pairings 26
19 Overview of rivets and tools 27
20 Overview of rivets used for repair measures 34
21 Thread repair for M6 pop rivet nut 35
22 Inserting pop rivet bolts WHT 005 180 36
23 Dent removal 37
24 Surface treatment 38
25 Contact corrosion 39
26 Matching the surface contour 40
27 Body dimensions 41
271 Body – front 41
272 Body – centre 43
273 Floor group 44
274 Body – rear 46
28 Moulded foam inserts 48
29 Tools 49
30 Straightening jig 53
301 Procedure for repairing structural body damage on Audi vehicles 53
50 – Body – front 54
Audi Q8 2018 ➤
Body Repairs – Edition 072019
Contents i
1 Upper longitudinal member for wheel housing (front section) – Renewal 54
11 Tools 54
12 Procedure 55
2 Upper wheel housing longitudinal member – Renewal 63
21 Tools 63
22 Procedure 64
3 Suspension turret – Renewal 70
31 Tools 70
32 Procedure 71
4 Front longitudinal member – Renewal 78
41 Tools 78
42 Procedure 79
5 Front longitudinal member – Partial renewal 90
51 Tools 90
52 Procedure 91
6 Front longitudinal member with support – Partial renewal 98
61 Tools 98
62 Procedure 98
7 Upper footwell cross member – Renewal 113
71 Tools 113
72 Procedure 114
8 Outer footwell cross member – Renewal 120
81 Tools 120
82 Procedure 121
51 – Body – centre 128
1 Permitted separating cuts on complete side frame 128
2 Roof – Renewal 129
21 Tools 129
22 Procedure 130
3 Roof with large sunroof – Renewal 152
31 Tools 152
32 Procedure 153
4 Roof side member – Renewal 170
41 Tools 170
42 Procedure 171
5 Front roof cross member – Renewal 178
51 Tools 178
52 Procedure 179
6 Rear roof cross member – Renewal 184
61 Tools 184
62 Procedure 185
7 Hinge mounting – Renewal 190
71 Tools 190
72 Procedure 191
8 Outer A-pillar – Renewal 197
81 Tools 197
82 Procedure 198
9 A-pillar reinforcement – Renewal 205
91 Tools 205
92 Procedure 206
10 Upper inner A-pillar – Partial renewal 210
101 Tools 210
Audi Q8 2018 ➤
Body Repairs – Edition 072019
ii Contents
102 Procedure 211
11 Upper inner A-pillar – Partial renewal (NAR vehicles only) 220
111 Tools 220
112 Procedure 221
12 Outer B-pillar – Renewal 231
121 Tools 231
122 Procedure 232
13 Inner B-pillar – Renewal 238
131 Tools 239
132 Procedure 239
14 Outer side member – Renewal 249
141 Tools 249
142 Procedure 250
15 Inner side member – Renewal 256
151 Tools 256
152 Procedure 257
16 Front seat cross member – Renewal 260
161 Tools 260
162 Procedure 261
17 Rear seat cross member – Renewal 266
171 Tools 266
172 Procedure 267
18 Centre tunnel – Renewal 272
181 Tools 272
182 Procedure 273
53 – Body – rear 281
1 Permitted separating cuts on complete side frame 281
2 Rear lock carrier – Renewal 282
21 Tools 282
22 Procedure 283
3 Tail light mounting – Renewal 290
31 Tools 290
32 Procedure 291
4 Cross panel – Renewal 298
41 Tools 298
42 Procedure 299
5 Inner D-pillar – Renewal 306
51 Tools 306
52 Procedure 307
6 Rear longitudinal member – Partial renewal 318
61 Tools 318
62 Procedure 319
7 Side panel – Renewal 327
71 Tools 327
72 Procedure 328
8 C-pillar reinforcement – Renewal 336
81 Tools 336
82 Procedure 337
9 Inner rear wheel housing – Renewal 342
91 Tools 342
92 Procedure 343
10 Rear wheel housing – Renewal 353
Audi Q8 2018 ➤
Body Repairs – Edition 072019
Contents iii
101 Tools 353
102 Procedure 354
11 Luggage compartment floor – Partial renewal 360
111 Tools 360
112 Procedure 361
12 Luggage compartment floor – Renewal 367
121 Tools 367
122 Procedure 368
Audi Q8 2018 ➤
Body Repairs – Edition 072019
PLEASE NOTE:
- This is the SAME MANUAL used by the dealerships to diagnose your vehicle
- No waiting for couriers / posts as this is a PDF manual and you can download it within 2 minutes time once you make the payment.
- Your payment is all safe and the delivery of the manual is INSTANT – You will be taken to the DOWNLOAD PAGE.
- So have no hesitations whatsoever and write to us about any queries you may have : heydownloadss @gmail.com


