

Ag Chem 2003 AirMax 180 System Service Manual_AG727570 – PDF DOWNLOAD
FILE DETAILS:
Ag Chem 2003 AirMax 180 System Service Manual_AG727570 – PDF DOWNLOAD
Language : English
Pages : 189
Downloadable : Yes
File Type : PDF
Size: 15 MB
IMAGES PREVIEW OF THE MANUAL:
DESCRIPTION:
Ag Chem 2003 AirMax 180 System Service Manual_AG727570 – PDF DOWNLOAD
GENERAL:
- This manual is not intended to replace the operators manual, parts manual or other available print manuals. Refer to the chassis and system manual for more operating, maintenance and safety information.
- Information, illustrations and specifications in this manual are based on the latest information available at the time of publication. All rights are reserved to make changes at any time without notice.
FOLLOW SAFETY INSTRUCTIONS:
Learn how to operate the machine and how to use all controls properly BEFORE OPERATION. Do not let anyone operate the machine or system, or perform service and maintenance procedures without proper instruction.
- Carefully read, learn and understand all safety messages and information in this manual, the operator’s manual and the machine’s safety signs. Keep safety signs in good condition.
- Replace missing or damaged safety signs Replacement safety signs are available from AGCO Corporation. Make sure new equipment components and repair parts include the current safety signs.
- Replace safety treads when worn, damaged or missing. Replace hand rails and steps if they become damaged. Keep the machine, all components and systems in the proper working condition. Unauthorized modifications to the machine may impair the function and/or safety, affect machine life, and void the warranty.
TABLE OF CONTENTS:
Ag Chem 2003 AirMax 180 System Service Manual_AG727570 – PDF DOWNLOAD
GENERAL 1-2
Safety Alert Symbol and Signal Words 1-2
FOLLOW SAFETY INSTRUCTIONS 1-3
Towing Other Vehicles / Trailers / Equipment 1-3
Modifications 1-4
Operating the System Safely 1-4
System Boom Safety 1-4
Overhead Electrical Power Lines 1-4
Protect Yourself 1-5
Handle Fuel Safely – Avoid Fires 1-5
Moving Parts 1-5
Maintenance and Service Safety 1-6
Hydraulic Safety 1-6
Work in a Clean Area 1-7
Understand Correct Service 1-7
Remove Paint before Welding or Heating 1-7
Batteries 1-7
Tires and Wheels 1-8
Use Proper Tools 1-8
Lift and Support Machine Properly 1-8
Avoid Eye Contact with Radar 1-8
Exhaust Fumes 1-9
Chemical Safety 1-9
Dispose of Waste Properly 1-1 O
TORQUE SPECIFICATIONS 1-10
General 1-10
Unified Inch Bolt and Cap screw Values 1-11
Metric Bolt and Cap screw Values 1-12
4 – Bolt Split Flange 1-13
Split Flange 1-13
Flare and Flare less Port Ends 1-14
Face Seal Port Ends 1-15
Metric Port Ends 1-15
Adapters and Tube Fittings 1-16
Adapters and Tube Fittings 1-16
DESCRIPTION 2-2
System Removal 2-3
System Installation 2-5
DESCRIPTION 3-2
CENTRIFUGAL FAN 3-2
Description 3-2
Removal 3-3
Installation 3-4
VENTURI MANIFOLD & FUNNELS 3-4
Description 3-4
Venturi Manifold Removal 3-6
Venturi Manifold Installation 3-6
Venturi Block Replacement 3-6
BOOMS 3-7
Description 3-7
Boom Cradle Locks 3-8
Boom Adjustments 3-8
Boom removal 3-8
Boom Installation 3-9
Boom Suspension Removal 3-9
Boom Suspension Installation 3-9
BAG TEST PROCEDURE 3-10
Description 3-1 0
Materials and Equipment Required 3-10
Align Boom Tubes to Manifold 3-1 O
Check Conveyor Gate Opening 3-10
Weight Adjustment Per Boom 3-12
Weight Adjustment Per Tube 3-12
Weight Adjustment Per Nozzle 3-12
Trim Tab Nozzle Adjustment 3-13
DESCRIPTION 4-2
CONVEYOR APRON CHAINS 4-2
Removal 4-2
Installation 4-2
Installation 4-4
FRONT CONVEYOR ROLLER AND BEARINGS 4-5
Removal 4-5
REAR IDLER ROLLER 4-5
Removal 4-5
Installation 4-5
CONVEYOR DRIVE SPROCKET & DRIVESHAFT 4-6
Removal 4-6
Installation 4-7
HYDRAULIC DRIVE MOTOR & CONVEYOR GEARBOX 4-7
Motor removal 4-7
Motor Installation 4-7
Gearbox removal 4-8
Gearbox Installation 4-
DESCRIPTION 5-3
HYDRAULIC TANK 5-4
Removal 5-4
Installation 5-4
Troubleshooting 5-4
VARIABLE DISPLACEMENT PUMP 5-5
1254 5-5
1264 5-6
CLEANING THE COMPENSATOR 5-7
Removal 5-8
Installation 5-8
Troubleshooting 5-9
FAN SPEED CONTROL 5-10
1254 5-10
1264 5-10
Removal 5-10
Installation 5-11
FAN MOTOR 5-11
Removal 5-11
Installation 5-12
HYDRAULIC GEAR PUMP 5-12
1254 5-12
1264 5-12
Removal 5-12
Installation 5-13
Troubleshooting 5-13
HYDRAULIC SERVO 5-14
Removal 5-16
Installation 5-16
Troubleshooting 5-18
CONVEYOR MOTORS 5-18
Removal 5-19
Installation 5-19
Troubleshooting 5-20
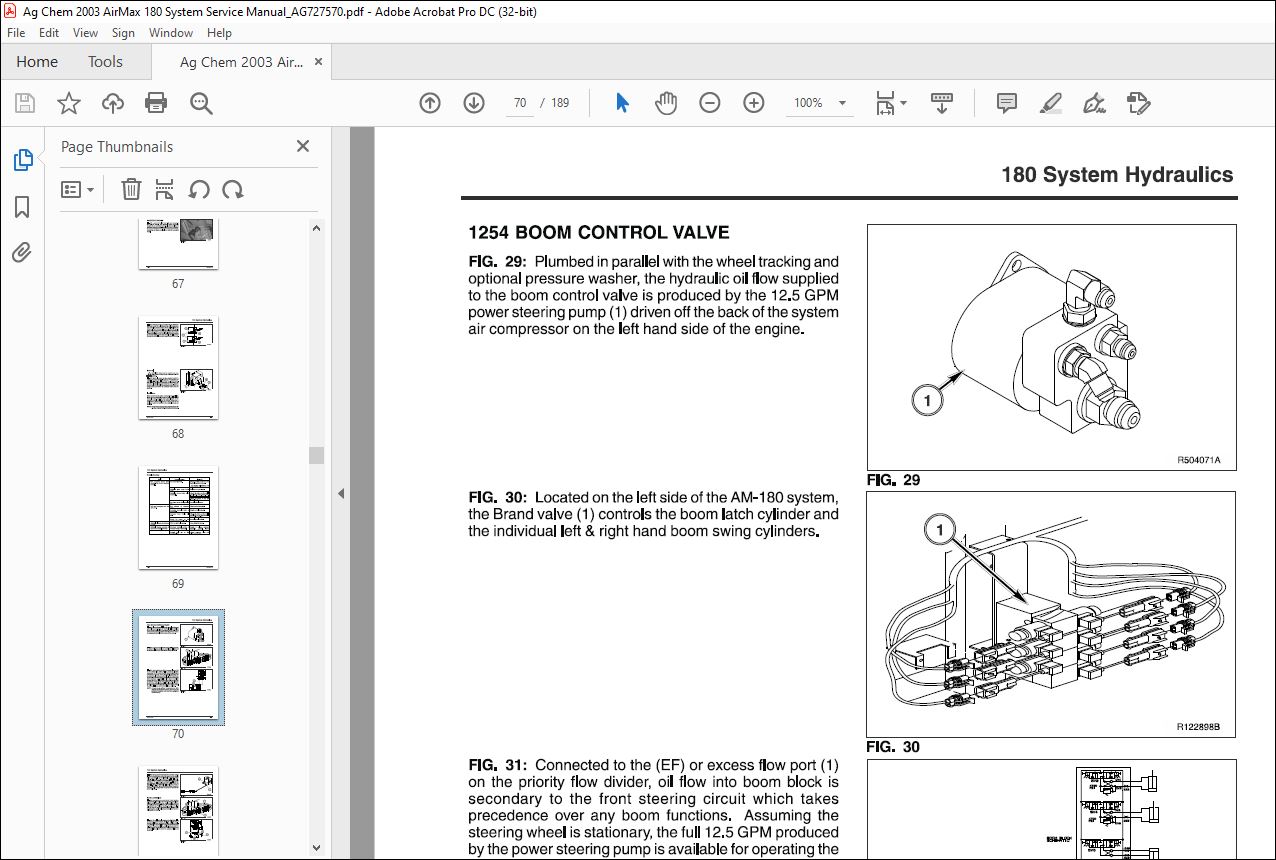
1254 BOOM CONTROL VALVE 5-21
Boom Lock/Unlock 5-22
Boom Swing 5-23
1264 BOOM CONTROL VALVE 5-24
Removal 5-27
Installation 5-28
Troubleshooting 5-28
LATCH CYLINDER 5-29
Removal 5-29
Installation 5-29
Troubleshooting 5-29
AG727570 5-1
180 System Hydraulics
FOLD CYLINDERS 5-30
Removal 5-30
Installation 5-30
Troubleshooting 5-31
OIL COOLER 5-32
Removal 5-32
Installation 5-32
Troubleshooting 5-32
PRESSURE GAUGE 5-33
Removal 5-33
Installation 5-33
Troubleshooting 5-33
DESCRPTION 6-2
BOOM MOTION SWITCHES 6-3
1254 Boom Lock/Unlock 6-4
1264 Boom Lock/Unlock 6-11
5 MPH Boom Swing Lockout 6-14
1254 Left Hand Boom Swing 6-16
1254 Right Hand Boom Swing 6-22
1264 Left Hand Boom Swing 6-28
1264 Right Hand Boom Swing 6-31
FAN SPEED CONTROL 6-34
1254 6-34
1264 6-34
FAN SPEED SENSOR 6-37
1254 6-37
1264 6-38
MASTER APPLY “SPREAD” SWITCH 6-39
1254 6-40
1264 6-41
1254 & 1264 6-41
CONVEYOR ON/OFF 6-45
Left Conveyor 6-45
1254 6-46
1264 6-49
Right Conveyor 6-53
1254 6-53
1264 6-57
SYSTEM RATE CONTROLLER 6-60
Servo Valve 6-60
1254 6-61
1264 6-63
Conveyor Speed Rate Sensor(s) 6-64
1254 Left Hand Rate Sensor 6-65
1254 Right Hand Rate Sensor 6-66
1264 Left Hand Rate Sensor 6-67
1264 Right Hand Rate Sensor 6-68
ELECTRIC ROLL TARP 6-69
Roll Tarp Switch 6-70
1254 6-71
1264 6-71
1254 & 1264 6-72
DESCRIPTION 7-2
CAB CONTROLS 7-2
Foam Marker Switches 7-2
Pressure Regulator Assembly 7-18
Pressure Gauge 7-20
Flow/Enable Valve 7-21
FOAM TANK ASSEMBLY 7-22
Foam Valve(s) 7-22
Foam Tank 7-23
DESCRIPTION 8-2
METERING WHEELS 8-3
Description 8-3
GRANULAR HYDRAULIC MOTOR 8-5
Description 8-5
Hydraulic Servo Valve 8-5
Description 8-5
VIDEO PREVIEW OF THE MANUAL:
PLEASE NOTE:
- This is the SAME exact manual used by your dealers to fix your vehicle.
- The same can be yours in the next 2-3 mins as you will be directed to the download page immediately after paying for the manual.
- Any queries / doubts regarding your purchase, please feel free to contact [email protected]
S.V


